Experimental Design
2027 season
On this page(14 sections)
Experimental Design asks a team of up to three students to design an experiment, run it on site, and report what it showed, all in about 50 minutes. You receive a question, a set of identical materials and a two-part student report form. Nobody hands you the answer, and the experiment itself earns nothing directly: every point comes from the report, which must prove that you planned a fair test, measured carefully, calculated correctly and explained what the data mean. Teams that score well build a simple, controlled experiment with several levels of one variable, repeat each level, calculate the right statistics, draw the graph correctly, and then argue from their own numbers. This guide follows the 2027 rules manual and the 2027 Experimental Design checklists for Division B and Division C, which are printed in the manual and posted as an electronic checklist on soinc.org.
Event format
| Rule | Division B | Division C |
|---|---|---|
| Team | Up to 3 | Up to 3 |
| Time | About 50 minutes | About 50 minutes |
| Calculator | Class II | Class III, stand-alone |
| Eye protection | Category C: indirect-vent chemical splash goggles marked Z87 (bring your own) | Same |
| Must bring | Goggles and writing utensils | Same |
| May bring | One timepiece, one linear measuring device, one Class II calculator | One timepiece, one linear measuring device, one stand-alone Class III calculator |
| Restriction | The timepiece, measuring device and calculator are only for their normal job and may not become part of the experiment | Same |
| Materials | Identical sets from the Event Supervisor, from a distribution center or in a container per team; what they are is unknown until the start | Same |
| Notes or reference sheets | None permitted (none are listed) | Same |
| Written test | None | None |
| Report | Two-part student report form from the soinc.org event page, printed single-sided | Same |
| Scoring | The 2027 Division B checklist: 106 points at Regionals, 118 at State and National | The 2027 Division C checklist: 117 points at Regionals, 140 at State and National |
The rules (sections 2c, 2d and 3a) say that every team gets the same question and the same materials, and that the report form is printed single-sided so that team members can pull pages apart and work on different sections at once. The experiment must take place entirely on site. No other safety equipment beyond goggles will be needed.
The clock is split into two parts. During the first 20 minutes you receive the assigned question or topic area, the materials and Part I of the report form, and you focus on designing and conducting the experiment. After 20 minutes you receive Part II, which covers analysis and reporting. You may keep experimenting for the whole event, so the split is about what you should be writing, not about when you can touch the materials. When you finish, you return every material and both parts of the form.
Notice what the rules do not mention: notes sheets, reference books, or a separate written test. Do not assume any reference material is allowed. The calculator is the only aid you should plan on for the analysis, and the timepiece and measuring device are for reading time and length, not for building into the set-up (using a ruler as a ramp, for example, breaks rule 2b).
One change from last season: the 2027 rules no longer require using a minimum number of the provided materials, so the 0.95 penalty for using too few is gone. The scoring checklist is printed in each division's manual right after the rules.
What the rules cover
The rules do not list topics the way a content event does, and there is no theme. On the day, the Event Supervisor assigns one question or topic area, the same for every team, and the rules ask that it let you study a relationship between an independent variable and a dependent variable (the rules' own example is height vs. distance). The scope is therefore a set of skills applied to an unknown question: designing, measuring, analyzing and reporting. The 2027 checklist that scores your report is the real content outline. It has two parts that line up with the two parts of the report form: Part I, design and construction of the experiment, and Part II, data, analysis and conclusions. The table below lists its sections in order.
| Checklist area | Division B | Division C | Level note |
|---|---|---|---|
| Statement of the problem and hypothesis | Yes | Yes | All levels |
| Independent, dependent and controlled variables | Yes | Yes | All levels |
| Constant | Not on the checklist | Yes | Division C only |
| Experimental control (standard of comparison) | Not on the checklist | Yes | Division C only |
| Materials, procedure and set-up diagrams | Yes | Yes | All levels |
| Qualitative observations | Yes | Yes | All levels |
| Quantitative data table | Yes | Yes, plus a significant-figure row | All levels |
| Graph | Yes | Yes | All levels |
| Statistics (central tendency and variation) | Yes, plus two extra statistics at State and National | Yes, plus a significant-figure row; higher maxima at State and National | Partly level-restricted |
| Possible experimental errors | Yes | Yes | All levels |
| Claim-evidence-reasoning (CER) analysis | Trend and outliers; variation at State and National | Same | Variation CER is State and National only |
| Conclusion | Yes | Yes | All levels |
| Applications and recommendations | Yes | Yes | Higher maxima at State and National |
| Abstract | Not on the checklist | Yes | State and National only |
The points attached to each area are in the scoring section, "What the checklist rewards," below.
Division C therefore asks for five things Division B does not: a constant, a standard of comparison, significant-figure rules applied to the data table, significant-figure rules applied to the statistics, and (at State and National) an abstract. Its "levels of the IV" row is also worth 4 points instead of 3. The tie-breaking order is the same for both divisions and is worth memorizing, because it tells you which parts of the report the judges use to separate close teams: CER analysis first, then procedure and set-up diagrams, then variables, then the data table, then the graph (rules section 4c). On the Division B checklist those are sections K, E, C, G and H; on the Division C checklist they are L, F, C, H and I.
The rules also set penalties that apply no matter how good the science is. They are listed under "Penalties that cannot be argued away," in the scoring section.
Foundations: variables, controls and the question
Independent, dependent and controlled variables
Every experiment in this event has the same skeleton. The independent variable (IV) is the one thing you change on purpose; each setting of it is a level. The dependent variable (DV) is what you measure in response. Everything else that could change the DV is a controlled variable (CV): you hold it the same across all trials, and you record its value so a reader can see that you did. A constant is a fixed physical value that cannot be changed by the experimenter, such as the speed of light in vacuum.
Here is a hypothetical experiment, used throughout this section, that the rules would accept as a relationship question: a ball is released from different heights on a ramp, and the distance it rolls is measured.
| Component | Example in the ramp experiment | Why it matters |
|---|---|---|
| Independent variable | Release height, at five levels | The thing you deliberately change |
| Dependent variable | Distance rolled along the floor (cm) | The thing that responds |
| Controlled variables | Same ball, same surface, same release method, same starting point on the ramp | Anything else that could change the distance |
| Constant (Division C) | A universal physical constant that matters to your set-up, such as standard gravitational acceleration g = 9.81 m/s² | Supervisors differ on what counts, so pick safe universal values with units |
The constant row is a common trap. Only the Division C checklist has it (one row, 2 points, for a constant that is correctly identified and relevant); Division B scores controlled variables only. Supervisors differ on what counts as a constant. The safest choices are universal physical constants that matter to your set-up (for example, standard gravitational acceleration g = 9.81 m/s²), always with units, and the electronic checklist on soinc.org gives the definition the judges use. Setup-specific values such as the mass of your ball belong in controlled variables, where the checklist wants three, each correctly identified and relevant (2 points each in both divisions).
The checklist also says the IV and the DV must be operationally defined: you state exactly how each is set or measured, with units and the tool used. "Height" is not operational; "vertical height of the release point above the floor, measured with the meter stick to the nearest 0.1 cm" is. Each of the IV and DV rows is worth 3 points in both divisions.
Two checks help you find a good IV. First, you must be able to change it, rather than just observe it. Second, the DV must be something you can measure with a tool you were given. If the IV and the DV can both be measured but you cannot change one of them, you have an observational setup, not an experiment, and the judges will notice.
The standard of comparison (Division C)
The standard of comparison (SOC) is the reference value of the DV when the IV is at a baseline setting, usually zero or no treatment. It lets you tell an effect from background variation: if the DV at baseline is already scattered, every other level must be read against that scatter.
In the ramp example, a release height of zero is not a useful baseline for rolling, so you would choose a different reference, such as a trial with the ball released from the lowest height you can set reliably. In a mass experiment, where a paper cup is loaded with added mass and the DV is how far it sags, the SOC is the trial with zero added mass, measured with exactly the same procedure as every other level. The 2027 Division C checklist gives the experimental control its own 4-point section with two rows: the SOC is logically identified for this experiment (2), and a reason is given for choosing it (2). In practice, name the SOC as a specific IV setting (it may be one of your levels), explain why that setting is the natural reference, and make sure the procedure shows it being measured the same way as every other level.
Levels and repeated trials
The "levels of IV given" row is worth 3 points in Division B and 4 in Division C, and the procedure section separately rewards steps for repeated trials. The checklist page shows only the point values; the detailed descriptors on soinc.org say how many levels each score needs, so check them. Plan at least four levels in either division and five if the materials allow: it costs little and protects you if one level fails. A level is a distinct setting of the IV; a repeated trial is another run at the same setting. Judges want repetitions inside a level, not runs that happen to use different levels. Five levels with three repeated trials each gives fifteen data points, which is enough to fit a trend and to calculate a mean and a standard deviation for each level.
Measurement: precision, accuracy and significant figures
Precision and accuracy
Accuracy is how close a measured value is to the accepted or true value. Precision is how close repeated measurements are to each other. A set of measurements can be precise and still inaccurate (all clustered, but off target), accurate but not precise (centered on the target on average, but scattered), both, or neither. The figure below shows the four combinations as dartboards with the spread of the hits below each one.
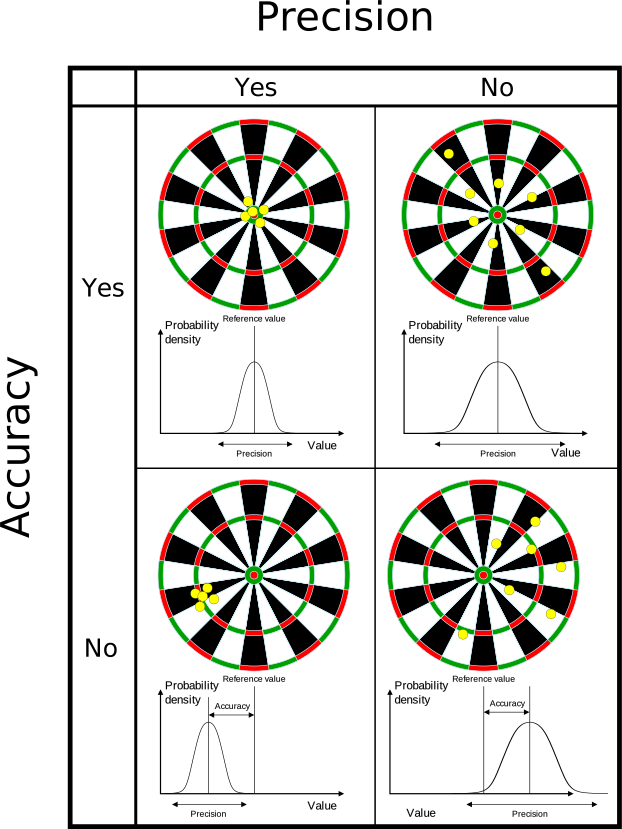
Accuracy is quantified with percent error, which compares an experimental value with an accepted one.
Random and systematic error
The 2027 checklist has a 6-point section on possible experimental errors in both divisions: two rows, each worth 3 points, for a specific error that is identified with its effect on the results discussed. It helps to know the categories cleanly.
Random error comes from the limited resolution of an instrument and from unpredictable variation in how you read or set it. It pushes readings both above and below the true value, and it is why repeated trials matter: averaging several measurements reduces the effect of random error on the mean.
Systematic error pushes every reading the same way. Faulty or uncalibrated equipment is the classic cause, such as a balance that reads 2 g heavy or a ruler with a damaged end. A consistently wrong method can produce the same kind of offset, and a clear report says so. Averaging does not remove systematic error, because the average of consistently biased readings is still biased.
Procedure error is a known mistake or a poor procedure, such as releasing the ball from slightly different points, or reading a meniscus from the wrong side. It can be random or systematic depending on how it acts.
| Error type | Typical source | How it shows in the data | How to reduce it |
|---|---|---|---|
| Random | Limit of the instrument, reading uncertainty | Scatter in repeated trials at one level | More repeated trials, averaging, finer instrument |
| Systematic | Faulty or uncalibrated equipment, consistent method flaw | Offset that is the same sign at every level | Check the instrument against a known value; change the method |
| Procedure | A specific mistake or poor technique | A single outlier or a shift in one part of the data | Standard steps, practice runs, careful recording |
A complete discussion of each error covers three things: its category, its effect on the data at the level where it happened, and its effect on the trend of the data. That is what "effect on results discussed" looks like when it earns the full 3 points. For a systematic error the trend effect is often the important one: a constant offset shifts the whole line and leaves the slope roughly unchanged, while a drift that grows with the IV changes the slope itself.
Significant figures and decimal places
Calculators display far more digits than your measurement justifies. Significant figures describe how many digits in a number carry real information. In Division C they are scored twice: one 2-point row for significant-figure rules applied to the data table, and another for the statistics. Division B has no separate significant-figure row, but a table full of calculator digits still undercuts the "units and labels" and example-calculation rows, so use the same rules. (The standard rules are in any general chemistry text; OpenStax Chemistry 2e has a clear treatment in its measurement chapter.)
Your tools set the precision of your data. The rule of thumb is to estimate one digit beyond the smallest division on the instrument. The figure below uses a ruler to show the idea: the same object is measured against a coarse ruler with only whole-unit marks and against a finer ruler with more tick marks. The finer ruler lets you record one more significant figure.

Statistics: central tendency and variation
The checklist wants measures of central tendency (where the data sit) and variation (how spread out they are), each with one example calculation, with units, done on a level of the IV. Here is how the 2027 statistics section is built (Regionals maximum / State and National maximum):
| Row | Division B | Division C |
|---|---|---|
| Statistics of central tendency used | 3 | 3 / 4 |
| Example calculation for each central-tendency statistic, with units, on a level of the IV | 2 | 2 |
| Statistics of variation included | 2 | 2 / 4 |
| Example calculation for each variation statistic, with units, on a level of the IV | 2 | 2 |
| Two additional accurately calculated statistics | 0 / 2 | Not on the checklist |
| Significant-figure rules applied to the statistics | Not on the checklist | 2 |
| Section total | 9 / 11 | 11 / 14 |
The higher Division C maxima at State and National mean more distinct measures earn more points there, so learn several of each kind. The detailed descriptors on soinc.org give the exact count each score needs and list the statistics that count in each group; in recent seasons the central-tendency group has included the mean, median, mode, line of best fit and percent error, and the variation group the standard deviation, IQR, range, minimum and maximum, frequency table, z-score and confidence interval.
Compute every statistic from the trials at one level, not across levels, and say which level you used. Standard deviation has one extra trap: say whether you used the sample or the population version, or a judge cannot check your example calculation.
The statistics you will use
- Mean: the sum of the values divided by how many there are. It is sensitive to outliers.
- Median: the middle value after sorting. For an even count, it is the average of the two middle values.
- Mode: the most common value, or the most common value after rounding to a stated precision.
- Range: the largest value minus the smallest. Report the minimum and maximum with it.
- Interquartile range (IQR): the middle 50% of the data, Q3 minus Q1. It is much less sensitive to outliers than the range.
- Sample standard deviation (s): a typical distance of a value from the mean, computed with n − 1 in the denominator.
- Percent error: how far an experimental value is from an accepted one (given above), usable only when an accepted value exists.
- Line of best fit: the regression line that minimizes the sum of squared vertical residuals (see the graphs section).
- Frequency table: counts or relative frequencies of each category, or of each bin of a quantitative variable. It is the natural summary for qualitative data.
- Z-score: how many standard deviations a value lies from the mean, . It is also a way to flag a value as unusual.
- Confidence interval (CI): a range of plausible values for the mean, stated with a confidence level such as 95%.
Worked example: one data set, every statistic
Suppose a team runs eight trials at one release height and records these distances in cm, all read to the nearest tenth: 2.0, 4.0, 3.0, 5.7, 7.2, 6.5, 15.0 and 12.0. Sort them first: 2.0, 3.0, 4.0, 5.7, 6.5, 7.2, 12.0, 15.0. Every value is recorded to tenths, so the sum is good to the tenths place and the mean can carry three significant figures.
The figure below shows the same kind of data summary as a box plot. The box runs from Q1 to Q3, the line inside is the median, and the whiskers reach the minimum and maximum. This is the layout you should copy when you draw your own box plots, and the labels show how each statistic is read off the plot.

How standard deviation is read
The standard deviation tells you how tightly values cluster around the mean. For data that are roughly bell-shaped, about 68% of values lie within one standard deviation of the mean, about 95% within two, and about 99.7% within three. Use this to judge whether a difference between two levels is larger than the normal scatter inside one level. If two level means differ by less than the spread within either level, a careful report says the difference may just be scatter, rather than claiming a real effect.
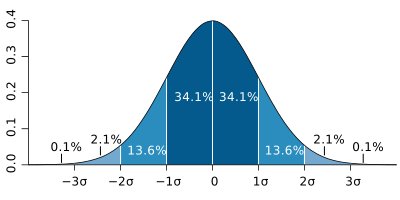
More trials shrink the interval and more scatter widens it. It describes where the true mean plausibly lies, not where 95% of single trials fall. With three trials per level is 4.303, so intervals are wide, which is worth saying in your report.
Graphs and trends
Graphs carry a large share of the points, and most lost graph points come from a small set of avoidable mistakes. Start by matching the graph type to the IV. A bar graph suits a qualitative IV, such as different materials or surfaces. A quantitative IV, such as height, mass or time, calls for a line graph or scatter plot, because it shows the spacing between levels and allows a trend to be read. The 2027 graph section is 12 points in both divisions, in three 4-point rows: an appropriate graph is provided, the graph is properly titled and labeled, and the scale and units are appropriate.
The figure below shows one data set drawn three ways. The points alone are the honest starting point. Joining the points with lines suggests a path through time or sequence that you may not have measured between levels. A straight best-fit line summarizes the trend, which is what your conclusion usually needs.

What judges look for under those three rows is consistent from season to season. The IV goes on the x-axis and the DV on the y-axis. The graph needs a descriptive title. Both axes need headings with units. If you use more than one symbol, you need a legend with its own title. The scales must be continuous, with no broken axis, and should fill the space you have so the data are readable. A tiny graph squeezed into one corner, or an axis with a jump in it, costs points on the scale item.
Slope and the line of best fit
When the IV is quantitative, the trend is the slope of the best-fit line: the least-squares regression line, which minimizes the sum of the squared vertical residuals. A Class II or Class III calculator with a linear-regression function gives it directly; otherwise draw the line by eye through the level means and read the slope from two points on it. A slope has units: the DV units divided by the IV units.
Analysis: CER reasoning
The checklist's claim-evidence-reasoning (CER) framework is how the judges measure whether you understood your own data. A claim is a statement of what you think is happening, phrased so it answers a question. The evidence is quantitative data that supports the claim; include only evidence that supports it. The reasoning connects the evidence to the claim in a sentence or two, and explains why the evidence means what you say it means.
The 2027 checklist asks for CER on several targets. Each needs a claim, evidence and reasoning, and each part is scored separately at 2 points, so 6 points per target. The CER section is 12 points at Regionals and 18 at State and National in both divisions, and it is the first tie-breaker. The evidence should be quantitative and should include only what supports the claim.
- The data trend: a claim about how the IV affects the DV, with the slope or the change in means as evidence.
- Outliers: a claim that a particular value is or is not an outlier, with a stated measure such as the 1.5 × IQR rule as evidence.
- Variation (State and National only, both divisions): a claim about how the data vary within levels, such as "the spread at 30 cm release height is larger than the spread at 10 cm," with the standard deviations or ranges as evidence.
- The hypothesis (in the separate 8-point conclusion section): the hypothesis restated, then a claim about whether the data support it, with evidence and reasoning.
A hypothesis is never proven or disproven in the CER sense. The evidence supports it or does not. Writing "the data prove the hypothesis" costs points, and so does writing "the hypothesis was right" without evidence.
The tie-breaker order in the rules puts CER analysis first, so a clean, number-backed CER is the best place to gain ground on a team with a similar total.
Correlation and causation in your reasoning
The reasoning part of a CER is where you explain why your evidence supports the claim, and one idea makes that reasoning much stronger. Correlation means two variables move together; the correlation coefficient runs from −1 to +1, with 0 meaning no straight-line relationship. Correlation alone does not show causation, because a third variable can drive both. The reverse is also true: a real cause can show little correlation when its effect is nonlinear, when other causes mask it, or when the range tested is narrow. A controlled experiment, where you change only the IV and hold the controlled variables fixed, is what lets you argue that the IV caused the change in the DV. Say so in the reasoning: "because release height was the only variable changed between levels, and the ball, surface and release method were held constant, the increase in distance can be attributed to height." If your controls slipped during the run, the honest reasoning says the trend may be partly due to that slip, and the same slip belongs in the errors section.
Designing, conducting and reporting
Planning in the first 20 minutes
Use Part I time to plan on paper before you touch the materials, and check your plan against the checklist before you start trials.
- Read the assigned question and identify the IV and DV it asks about.
- Inventory the materials and write down what each could do in an experiment that answers the question. Remember that your own timepiece, ruler and calculator may not become part of the set-up.
- Choose the IV, its levels (plan at least four, and five if you can), and how you will set each level precisely.
- Choose the DV and the tool that measures it. Check the tool's smallest division so you know how many significant figures to record.
- List at least three controlled variables and their values, with units. In Division C, also pick a constant and a standard of comparison and note why you chose it.
- Write the statement of the problem and the hypothesis, with its rationale.
- Sketch more than one diagram of the set-up (the checklist asks for multiple diagrams) and label them with measurements and units.
- Plan the repeated trials and the data tables before you start.
The procedure, diagrams and data
The procedure and set-up diagrams section is worth 13 points in both divisions and is the second tie-breaker. Its rows ask for a procedure in list form, in a logical sequence, with steps for repeated trials, plus multiple diagrams of the set-up, all appropriately labeled, and a procedure detailed enough to repeat the experiment accurately (that last row is worth 3). Write a numbered list with one step per line that includes every action that happened during the experiment, including the repeated trials at each level. A paragraph of steps does not meet the list-form row. A reader should be able to repeat the experiment from your procedure alone, with no unstated assumptions and no obvious questions left over.
Your diagrams earn points only when they show something the procedure does not. Label the parts and give measurements and units for every tool in the picture. Two diagrams, such as the whole set-up and a close-up of how the DV is measured, satisfy the "multiple diagrams" row.
The materials section (4 points) has two rows: every material you used is listed with its quantity, and nothing you did not use appears on the list. List the amount you used, not the amount provided.
The data go in two tables. The raw data table holds every measurement with its units and labels (3 points). The condensed table holds only the data that go into the graph, such as the mean at each level, with one sample calculation for each derived variable (2 points). Division C adds a 2-point row for significant-figure rules applied to the table, which makes the data-table section 5 points in B and 7 in C. It is the fourth tie-breaker.
The qualitative observations section (6 points) is for words, not numbers. The checklist asks for observations about the set-up, the procedure and the results, 2 points each. Good observations describe what happened and why it may matter: a set-up that wobbled, a step that was hard to repeat, a result that looked like an outlier and a possible reason for it. Measurements belong in the data table, so keep numbers out of this section apart from naming an IV level.
Errors and suggestions
Name two specific errors from your own experiment. For each, give its category (random, systematic or procedure), its effect on the data at the affected level, and its effect on the trend. Generic errors such as "human error" earn nothing.
The applications and recommendations section has three rows: suggestions to improve the experiment, with a rationale; suggestions for practical applications of the experiment; and suggestions for future experiments. Each row tops out at 4 points at State and National, and the section is worth 8 points at Regionals and 12 at State and National; the detailed descriptors on soinc.org say how many suggestions each score needs. Write several in each row. Improvements should fix this experiment, be specific enough to act on, and say why they would help, ideally by naming the error they remove. "Use better equipment" and "take more time" are generic and do not earn credit. Practical applications are real-life uses of what you found, and future experiments are changes to the design that would make a different, related experiment. Write these as specific sentences: "Calibrate the meter stick against a steel rule before the trials" is better than "use better measuring tools."
The conclusion and the abstract
The conclusion (8 points) restates the hypothesis, exactly as you first wrote it, with no changes to the wording. Then it gives the claim, evidence and reasoning on the hypothesis, 2 points each.
The abstract is Division C only and scored only at State and National, for 10 points in three rows. The first (3 points) wants the statement of the problem, the hypothesis and a practical application. The second (3 points) wants a well-organized summary of the procedure and the data trend. The third (4 points, the largest) wants a discussion of errors and improvements. Write it as a short paragraph rather than lists, keep the problem and hypothesis worded as they were earlier in the report, and leave enough time for it: at State and National it is worth more than the whole graph's title-and-labels row.
What the checklist rewards
The table below lists the 2027 checklist sections and their points for each division. Where a section shows two numbers, such as 11/14, the first is the Regionals maximum and the second is the State and National maximum; the extra points come from the rows that are shaded on the checklist.
| Checklist section | Division B | Division C |
|---|---|---|
| Statement of the problem | 2 | 2 |
| Hypothesis | 6 | 6 |
| Variables | 15 (IV 3, levels 3, DV 3, three controls 6) | 18 (IV 3, levels 4, DV 3, three controls 6, constant 2) |
| Experimental control (standard of comparison) | Not listed | 4 |
| Materials | 4 | 4 |
| Procedure and set-up diagrams | 13 | 13 |
| Qualitative observations | 6 | 6 |
| Data table | 5 | 7 (includes 2 for significant figures) |
| Graph | 12 | 12 |
| Statistics | 9 / 11 | 11 / 14 (includes 2 for significant figures) |
| Experimental errors | 6 | 6 |
| Claim-evidence-reasoning | 12 / 18 | 12 / 18 |
| Conclusion | 8 | 8 |
| Applications and recommendations | 8 / 12 | 8 / 12 |
| Abstract | Not listed | 0 / 10 (State and National only) |
| Part I (design and construction) | 51 | 60 |
| Part II (data, analysis and conclusions) | 55 / 67 | 57 / 80 |
| Total | 106 / 118 | 117 / 140 |
The largest sections are Variables, Procedure, Graph, Statistics and CER, and four of them are also tie-breakers, so practice them most.
Penalties that cannot be argued away
The rules penalize a few things outright. They apply regardless of the science, and some are easy to avoid if you plan for them.
| Problem | Rules section | Consequence |
|---|---|---|
| A participant breaks a safety rule | 4d | Asked to leave the room and disqualified |
| Poor clean-up | 4e | Final score multiplied by 0.95 |
| Work not addressing the assigned question or topic | 4f | Final score multiplied by up to 0.75, depending on how far the report deviates |
| Data not collected by an on-site experiment, or fabricated | 4g | Final score multiplied by 0.25 |
The safety rule is the one that ends a team's day, so bring the goggles, wear them whenever the experiment calls for them, and never let a participant leave a set-up unsafe. The 0.95 clean-up multiplier looks small, but on a 118-point State score it costs about 6 points, more than the gap between many close teams. Blank, illegible or inappropriate answers score zero on their rows (rule 4b), so write legibly and put something specific in every section.
Strategy
- Split by role, then cross-check. With three people, one can run the set-up and the trials, one can keep the raw data table and the graph and do the statistics, and one can draft the procedure and the CER. Each person checks another's numbers before the report form goes in. The single-sided form exists so you can split the pages. Two roles often overlap on a team of two, and that is fine.
- Plan the clock. Use the first 20 minutes for the plan and the first trials. When Part II arrives, you should already have most of the data; the analysis and the report take the rest. Reserve time at the end for clean-up, because it is a penalty even when the experiment itself is excellent.
- Keep the design simple and on topic. Choose a design that answers the assigned question with the materials given; an off-topic experiment risks a multiplier of up to 0.75. Name each material in the procedure and in the materials list, and list only what you actually used, with the amount used; listing unused materials loses points on the materials item.
- Know your level's checklist. At Regionals, the shaded rows (extra statistics, variation CER, the abstract in C) score nothing, so spend that time on the core rows. At State and National, budget time for them.
- Show the arithmetic. Write the formula, the numbers you substituted, and the answer with units and the right significant figures. A correct formula with a wrong final digit still shows the judges that you understand the method.
- Write sentences that carry a number. "The mean at 30 cm was 31.2 cm, 6.1 cm above the mean at 20 cm" beats "the distance went up a lot."
- Never report data you did not measure. Fabricated or unmeasured values carry the 0.25 penalty, and the judges are looking for exactly that.
Common pitfalls
How tournaments test this
The Scio.ly archive holds 241 Experimental Design questions from three invitational tests in two seasons: the Lake Braddock MiniSO Invitational (100 questions), the Rickards Mini Invitational (98) and the GGSO Invitational (43), from the 2020-21 and 2021-22 seasons. There are 134 questions tagged Division B and 107 tagged Division C. The question bank has no Experimental Design entries, so everything here comes from the archive. These are older, written-format questions. They are not the current on-site event, and they cannot show you what a team of three must do with a physical set-up. Use them to practice the statistics, error, significant-figure and graph skills that the 2027 checklist rewards, and skip their sampling and probability items, which the checklist does not score.
Question format. Of the 241 questions, 150 (62%) are free response, 36 (15%) are numeric, 30 (12%) are multiple choice, 18 (7%) are true or false and 7 (3%) are select-all. Expect to write short answers and justify numeric ones with units.
Recurring terms. The table below counts questions in the archive that contain each term. The counts are the number of questions in which the term appears, so they overlap.
| Term | Questions containing it | What to practice |
|---|---|---|
| Mean | 24 | Computing means per level and writing the calculation |
| Error | 20 | Naming the error type and its effect on data |
| Decimal places | 16 | Addition and subtraction rounding |
| Random error | 9 | Scatter, averaging and repeated trials |
| Standard deviation | 11 | Sample versus population, and what the spread means |
| Significant figures | 9 | Counting digits and rounding through calculations |
| Data set | 8 | Sorting, median and quartiles |
| Confidence interval | 6 | Reading a stated interval and what a narrower one means |
| Systematic error | 5 | Offsets and why averaging does not remove them |
Test yourself
The questions below are real items from the archive. Click an answer to check it; each links to its full test. Explanations are added where the reasoning is not obvious, and every key has been re-solved for this guide.
- 1
A thermometer reads the temperature in a refrigerator 10 times and yields the following values in degrees Celsius: 39.1, 39.4, 39.1, 39.2, 39.4, 39.1, 39.2, 39.2, 39.1. The true temperature in the refrigerator is 36 degrees Celsius. Which of the following best describes the thermometer?
- 1
It is possible to have causation without noticeable correlation.
From: Lake Braddock MiniSO Invitational, 2020-21, Division B
References and further reading
- Science Olympiad, Experimental Design event page, with the 2027 student report form and the electronic Experimental Design Checklist: https://www.soinc.org
- SciOly Wiki, Experimental Design (a summary of the event, for cross-checking only): https://scioly.org/wiki/index.php/Experimental_Design
- NIST/SEMATECH, e-Handbook of Statistical Methods, on measurement, error and exploratory data analysis including box plots: https://www.itl.nist.gov/div898/handbook/
- OpenStax, Chemistry 2e, measurement chapter (significant figures and rounding): https://openstax.org/details/books/chemistry-2e
- OpenStax, Introductory Statistics (free online textbook; mean, standard deviation, quartiles and the normal distribution): https://openstax.org/details/books/introductory-statistics
- Figures from Wikimedia Commons, with licenses and credits in each figure caption.
- Practice more: the Scio.ly test archive has public Experimental Design tests.
- Related guides on this site: Disease Detectives (rates, 2 × 2 tables and sensitivity), Chemistry Lab (measurement and lab technique).
Official references
Sample notesheet
Download a printable, rule-compliant sample notesheet. Customize with your notes.