Scrambler
2027 season
On this page(17 sections)
Scrambler is a build event. Your team designs and builds one device that uses a falling mass to drive an egg-carrying Vehicle down a track and stop it as close as possible to a target wall, without breaking the egg. Nothing on the test is memorized. The score is a sum of things you can measure: each centimeter between the Vehicle and the target costs points, each second of run time costs points, an optional Can Bonus rewards a Vehicle that swings out between two cans and comes back, and a broken egg or a rule violation can cost far more than a slightly imprecise stop. Teams that score well treat the device as an experiment. They build a system that stops in the same place on every run, predict where it will stop before they run it, and know exactly which rule could cost them points.
Event format
| Rule | Detail |
|---|---|
| Team | Up to 2 students |
| Approximate time | 12 minutes (the rules' estimate for the whole event); each team gets an 8-minute Event Time |
| Device | One Scrambler, designed and built by the team; the launcher and falling mass may be shared with other teams from the same school |
| Kits | Purchased or open-source kits are allowed, but only with at least two documented functional modifications (see below) |
| Impound | Required before the first time slot; the falling mass must be detached |
| Eye protection | Class B |
| Calculator | Class III (a stand-alone calculator is the only electronic item allowed) |
| Format | Hands-on build and run; the Event Supervisor (ES) measures, times and judges each run |
The 2027 rules also expect teams to be able to explain their device: its design, how it was built and how it runs, with the expectations spelled out in the Building Policy on soinc.org. The event rules do not say when those questions are asked, so be ready at any point in your slot.
What the rules cover
The 2027 rules manual splits Scrambler into eight numbered parts. The table groups them by what they mean for your design and your preparation. Every item applies at every level unless the last column says otherwise.
| Rules area | What it covers | Level or division differences |
|---|---|---|
| Description and parameters | The task (move an egg along a track and stop near a target without breaking it), team size, impound, eye protection and calculator class | None listed |
| Construction parameters | Size box, propulsion energy, stopping mechanism, egg holder and backstop, pencil start, moving parts, electronics ban, design knowledge, kits and the Kit Modification Form | None listed |
| Competition | Impound, check-in, Event Time, egg selection, taping, run procedure, optional Can Bonus, violations | None listed |
| Scoring | Run score, distance and time scores, Can Bonus, failed runs, penalties (including the Non-modification Penalty), final score, ties and tiebreakers | None listed |
| Scoring examples | Worked examples of run scores and the final score | Illustrative only |
| The track | Surface, start and target marks, Bonus Line and bonus cans, terminal barrier (TB), track area | In-person tournaments: the ES supplies and sets up the track. Virtual tournaments: the team supplies a compliant track; any deviation is a competition violation for every run |
| Definitions | ES, tools, target distance, vehicle distance, run time, complete stop, successful and failed runs, broken egg, Vehicle Measurement Point | Target-distance interval depends on level (see the scope callout below) |
What is new in 2027
| Change | What it means for you |
|---|---|
| Optional Can Bonus | A Bonus Line halfway down the track carries two cans; a Vehicle that passes between them earns a bonus that grows as the gap shrinks |
| Kits allowed with modifications | A purchased or open-source kit is legal if you make at least two functional modifications and document them on the Kit Modification Form; otherwise each run takes a 50-point penalty |
| Backstop attachment holes | Holes are now allowed in the back, sides, bottom or top of the backstop for mounting it; the flat front face stays solid |
| Start position | The egg tip must sit over the Start Point within about 1 cm; other parts of the Scrambler may extend past the Start Point, as long as the ES can still see the mark |
| Floor rules | Competitors may not put tape on the event floor, and the ban on testing on the track floor now covers the day before the event as well as the event day |
How a run happens
Knowing the sequence matters because the clock, the pauses and the violation notices all follow a set order.
- Impound. Before your first time slot, you hand in one Scrambler, spare parts, any alignment device, any papers and, if you built from a kit, the completed Kit Modification Form. The falling mass is detached and impounded separately. Tools do not need to be impounded.
- Target announced. After impound and before your first slot, the Target Distance is posted. Every team at that competition gets the same target.
- Check-in. Participants enter with their tools and retrieve their impounded items when the ES says to. You present your Vehicle to the ES for inspection and measurement. If the ES finds a construction violation, you are told at this point, and you may use your Event Time to fix it. Event Time is paused while the ES re-evaluates the device. Once check-in starts, you may not leave the area or receive outside help or materials until your Event Time is over.
- Egg selection. The ES supplies uncooked grade A large chicken eggs. You choose one at the end of check-in.
- Event Time. You have 8 minutes to attach the falling mass, tape the egg, adjust, repair and run. The Event Time ends after two runs, when the egg breaks, or when the 8 minutes are up.
- Set up and ready-to-run review. Place the egg tip over the Start Point (within about 1 cm). If you are going for the Can Bonus, place the inside can now; the ES places the outside can. When you signal you are ready, the ES pauses the clock and inspects the Vehicle in its ready-to-run configuration, including measuring its size, and then measures the gap between the cans, the Inside Can Distance. Violations are announced only at the end of each run. Before a run, you may ask about specific suspected violations.
- Trigger. You start the run with an unsharpened #2 pencil. You may touch only the pencil, not the Scrambler, during the triggering action.
- Review and measurement. The ES decides whether the run was successful or failed, then measures the Vehicle Distance and the run time for successful runs. Violations are recorded and announced after the run. The clock restarts once you pick up the Vehicle or start taking your own measurements. The ES reviews the recorded data with the team.
Scoring
Scoring is the most important section to understand, because it turns every design decision into points. Low score wins.
Five consequences follow directly from the formula:
- A centimeter costs 2 points; a second costs 1 point. A 1 cm miss is worth the same as 2 seconds of run time. Accuracy dominates speed.
- Vehicle Distance is a plain point-to-point distance to the Target Point at the center of the TB. Every centimeter between the Vehicle Measurement Point and the target costs 2 points. Because a wall sits at the target, you cannot overshoot freely: the rules make it a Competition Violation if any part other than the egg touches the TB or if the egg tip goes past the front of the TB, and either one adds 150 points.
- A failed run is worth 2,600 points before any penalties. A failed run's Distance Score is a fixed 2,500 points, and its Time Score is 0. Any successful run that stops within a few meters of the target scores in the hundreds, so one successful run decides the score.
- The final score is the better of two runs. A bad second run cannot hurt you. It can only help. That changes how you should spend your second run.
- The Can Bonus is negative, so it lowers your score. It runs from −5 points (a 100 cm gap) to −55 points (no gap at all), and every centimeter you narrow the gap is worth another 0.5 points, a quarter of what a centimeter of Vehicle Distance is worth.
Penalties and bonuses in one place
| Item | Effect | Notes |
|---|---|---|
| Can Bonus | −0.5 × (110 − Inside Can Distance), so −5 to −55 points | Earned only if every part of the Vehicle passes between the two cans and the gap between them has not changed |
| Competition Violation | +150 points to the run | One or more violations on the run |
| Construction Violation | +300 points to the run | Includes floor damage caused by the device or by your actions, even before or after the run, and parts that fall off during a run |
| Non-modification Penalty | +50 points to each Run Score | A kit-based Scrambler without two documented functional modifications on an impounded Kit Modification Form |
| Failed-run Distance Score | 2,500 points (fixed) | Replaces the distance formula |
| Vehicle not impounded | +5,000 points to the final score | A team-level penalty |
Violations can also be assessed on failed runs, so a failed run can carry a penalty too. Every violation is recorded, even when a run has already failed.
Any failure of the construction parameters (size box, backstop and dowels, energy rules, electronics and so on) that is still present when you run is a Construction Violation, which adds 300 points to that run. The rules also name floor damage by the device or your actions (even before or after the run) and pieces falling off during a run as Construction Violations. Fix anything flagged at check-in before you run.
Failed runs and runs that do not count
A run is scored as a Failed Run (2,500 distance points, 0 time) when any of these happens:
- The egg broke on run 1, which makes run 2 a Failed Run.
- The Vehicle starts before the ES is ready.
- The Vehicle's distance cannot be measured, for example because the team picked it up first.
- The team pushes the Vehicle down the track.
- The team has only one successful run in its 8 minutes, which gives the second run a Failed Run score. If the Vehicle never moves during Event Time, the team gets two Failed Runs.
A trigger that fails to move the Vehicle is not a run at all, so you may keep working as long as Event Time remains. A Vehicle that is in its ready-to-run configuration before Event Time ends is still allowed to complete its run. Competitors who follow the Vehicle down the track before being called to retrieve it commit a Competition Violation. If the ES uses more than one track, you pick one and must use it for both runs.
Ties and tiebreakers
If two teams are tied on the final score, the 2027 rules use these tiebreakers in order: (1) better Vehicle Distance on the scored run; (2) lower Time Score on the scored run; (3) better Vehicle Distance on the non-scored run; (4) better Time Score on the non-scored run. Two teams that both have two failed runs, with no violations, remain tied. Other ties are possible.
Physics of the drive
The Scrambler has one permitted energy source: a falling mass of no more than 2.00 kg. Gravitational potential energy from the falling mass is converted into kinetic energy of the Vehicle and of the falling mass itself, and some is lost to friction and other losses. Any other part whose potential energy drops and feeds the Vehicle after actuation counts as part of the falling mass. Other stored energy, such as a pre-tensioned spring that launches the Vehicle, must sit in its lowest energy state in the ready-to-run configuration. Pre-loaded energy storage is allowed for other functions, such as braking, as long as it does not add kinetic energy to the Vehicle.
The energy chain runs like this: ↑ falling mass or drop height → ↑ potential energy → ↑ launch speed → ↑ energy that must be dissipated in braking → ↑ stopping distance. Every link in that chain is a place where you can lose control of the final position.
The formula treats all of the Vehicle's mass as if it were rolling wheels, which slightly overstates the rotational loss for a light-wheeled design. It also assumes the string drives the Vehicle one-to-one (the Vehicle moves as far as the mass falls), that the rotating parts roll without slipping, and that all losses are lumped into η. The denominator matters: the falling mass and the Vehicle's rotating, translating mass both absorb energy. That is why adding falling mass has diminishing returns. As m grows large compared with M(1 + k), the speed approaches √(2ηgh), so a heavier mass helps less and less.
Notice what the example teaches. Speed goes with the square root of the energy, and stopping distance goes with speed squared, so stopping distance is directly proportional to the drive energy: a 3% energy error becomes about a 3% distance error. Errors that act on speed (string slip, release kick) are amplified, though: a 3% speed error becomes about a 6% distance error. The next section is about that amplification.
What limits the drop height
The Scrambler must fit inside a box with a 100.0 cm × 50.0 cm base and a 100.0 cm height, measured in the ready-to-run configuration. The egg, falling mass and protective cushion are all inside the box. The falling mass cannot touch the venue floor at any time during a run, so the cushion has to sit under it. The box limits the drop height (and, for a one-to-one string drive, the drive stroke), and the cushion takes up part of the 100 cm height. A design that needs the full 100 cm of drop has no room for the cushion, so plan the drop height with the cushion included.
Where energy goes
- Rotating parts. Wheels and any spinning shafts store energy that does not carry the Vehicle forward. A solid wheel loses about a third of its kinetic energy to rotation (for k = 0.5), and light, spoked wheels with a lower k waste less. A flywheel spun up before the run is not allowed, because it would add kinetic energy in a non-lowest energy state.
- Rolling resistance. Each wheel deforms slightly where it touches the track, and that deformation dissipates energy as heat. Stiff wheels on a hard, smooth surface lose less than soft wheels or wheels that bounce. The track in the rules is smooth, level and hard, so stiff, well-aligned wheels are the usual choice.
- Drive losses. The string winding onto the axle, bearings in the axles, and any slip between the string and the drive axle all take energy. Those losses are where the efficiency factor η mostly lives. Measure them by comparing the speed you predict with the speed you observe.
Stopping and accuracy
The device has to stop somewhere in a range the target distance defines, and it has to do so automatically. The stopping mechanism must be contained completely inside the Vehicle and work without anyone touching it. The Vehicle may not be remotely controlled or tethered.
If the Vehicle leaves the drive phase at speed v and brakes with a roughly constant deceleration a, the stopping distance is:
Because d goes with v², the sensitivity is strong. If your speed at braking is off by 2%, the stopping distance is off by about 4%.
Two design habits follow from this. First, the stop should be predictable across runs, not just correct on one run. Second, you should separate errors you can calibrate (a steady offset) from errors you cannot (run-to-run scatter). A steady offset can be removed by changing a setting. Scatter cannot be removed by any setting, so it has to be reduced by design.
Brake choices
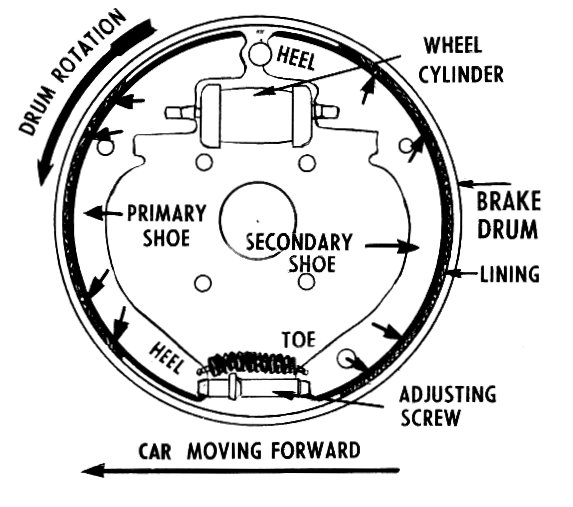
The rules do not prescribe a brake type. They prescribe behavior: automatic, contained in the Vehicle and not remotely controlled. Common approaches include friction brakes that press a pad or shoe against a rotating part, mechanical stops that engage at a set point, and ramps or wedges that convert forward motion into lifting work. Each has a different sensitivity to speed. Dry friction pads give a roughly speed-independent force, but it varies with wear and surface condition. Mechanical stops produce a fixed stop position that is easy to calibrate but can cause a jolt. Pick the approach whose errors you understand best, then test it.
The most common competitive approach triggers the brake after a fixed distance (for example a wing nut that travels along a threaded axle and locks the wheel after a set number of turns). The braking point then does not depend on launch speed, so d = v²/2a applies only to the short skid after the lock. Calibration is turns per centimeter, which is far less sensitive to drive scatter.
Recoil and the complete stop
Run Time begins when you actuate the Vehicle and ends when it comes to a complete stop. A complete stop means the Vehicle is stationary for 3 or more seconds, and those 3 seconds are not counted in the run time. Recoil and oscillations are included in the run time. A Vehicle that stops, rocks back and forth, or bounces forward again adds seconds to its Time Score and may also drift away from the target. A damped stop finishes the run cleanly.
Calibration
Calibration means building a table that maps a setting (drop height, brake position, string length) to the distance the Vehicle actually travels. Build the table with repeated runs, not single runs. A single run tells you almost nothing about scatter. The table also has to match the surface: a Vehicle calibrated on carpet will travel a different distance on the hard, smooth track the rules require. When you can, calibrate on a surface close to the tournament track.
Construction rules and what they change in your design
Some of the construction rules look like paperwork but each one sets a design constraint. The table below translates them. Read the full wording in the 2027 rules manual before you build, and confirm anything unclear with the Building Policy or your ES.
| Rule (manual section) | What it means for design |
|---|---|
| Size box, 100.0 × 50.0 × 100.0 cm, including egg, falling mass and cushion (3.b) | Limits drop height and layout; the cushion counts toward the box |
| Falling mass ≤ 2.00 kg, detached at impound, never touching the floor (3.c, 4.a) | Sets the maximum mass; design the mass attachment to release cleanly at check-in |
| Additional kinetic energy sources in their lowest state at ready-to-run (3.c.i) | No pre-tensioned spring may launch the Vehicle |
| Parts whose potential energy drops and feeds the Vehicle count as the falling mass (3.c.ii) | A second weight or counterweight that drops to help the drive is part of the falling mass |
| Stopping mechanism inside the Vehicle, automatic, not remote or tethered (3.d) | Brake must trigger on its own; no manual brake lever held by a person |
| Pre-loaded energy storage allowed for other functions, such as braking (3.d.ii) | A preloaded spring to set the brake is allowed; one that adds propulsion is not |
| Vehicle moves as a whole; no anchors, tethers or tie-downs; only wheels or treads, drive string, drive attachment and parts already in contact may touch the floor (3.g) | Every part of the Vehicle must belong to the Vehicle; all wheels must touch the floor at launch |
| Pieces falling off during a run are a Construction Violation (3.g) | Secure every fastener, and check after every run |
| No electric or electronic components, except a Class III calculator (3.h, 8.b) | No LEDs, sensors, phones or motors on the Vehicle |
| Pencil start: the release is actuated with a #2 pencil (unsharpened, eraser unused) that the ES hands out (3.f) | The release has to be triggered by the pencil, and the trigger must not add energy; the pencil itself may be the release and may stick out of the size box |
| No part of the Scrambler taped or attached to the event floor (3.b), and competitors may not put tape on the floor at all (4.d) | The launcher has to hold itself in place by its own weight and geometry, and you cannot tape down alignment marks |
| Kits allowed with at least two functional modifications, documented on the Kit Modification Form and impounded (3.j) | A kit without them takes 50 points on each run; a cosmetic change does not count, so modify something that changes how the device works |
Egg holder and backstop specifications
The egg holder is the most specific part of the construction rules, so check each dimension with a tape measure before you impound.
| Element | Requirement |
|---|---|
| Backstop | One solid, rigid, flat, unpadded wooden piece; the face may not have holes or filled holes, but holes in the back, sides, bottom or top for attaching it to the Vehicle are allowed. Flat front face whose width and height must each be within half a centimeter of 5 cm; the two are checked separately, so the face need not be square. Thickness at least 1.1 cm. Plywood is allowed; balsa is not. |
| Dowels | Two wooden round dowels, ¼ in to ⅜ in, that carry the egg. Extend 3.0 to 4.0 cm from the backstop face, within 1.0 cm of the backstop's bottom edge. |
| Dowel height | Bottom of the dowels 5.0 to 10.0 cm above the track |
| Mounting | Backstop mounted at the front of the Vehicle, rigidly enough that it cannot move during impact, so the egg is the foremost part of the Vehicle |
The backstop has to be rigid, because a backstop that flexes under the egg's load changes the stopping behavior and can crack the egg. It also has to be unpadded, so you cannot cushion the egg with foam against the backstop face.
The egg
The egg is the most fragile part of the Scrambler, and the rules attach many consequences to it. A broken egg ends your Event Time, it can turn your next run into a failed run, and it is a Competition Violation if it breaks during a run. The rules' test for breakage is practical: the shell counts as broken once it is cracked enough to leave a damp mark on a paper towel.
- Before the first actuation. If the egg breaks before the device is triggered, there is no penalty and the ES provides a second egg, which may be used, at the ES's choice. Plan on one replacement, not more. The rules also say the Event Time ends when the egg breaks, which sits oddly beside this rule, so ask the ES how a pre-launch break affects your remaining time before you rely on it.
- During a run. A broken egg is a Competition Violation, adding 150 points. The Event Time then ends, so you cannot make a second run.
- After run 1. If the egg breaks on the first run, the second run is scored as a failed run. Since a failed run is worth 2,600 points, that run never helps you.
- Taping. The ES supplies the tape. Keep tape off the outer 1.0 cm at each end of the egg. The blunt end has to rest against the backstop where the ES can see it, and the egg must stick out farther forward than any other part of the Vehicle. If the ES decides it is needed, the egg can also be wrapped in a clear, thin plastic sleeve.
When you select your egg at the end of check-in, inspect it closely. The egg you pick is your run egg, and its shell condition is part of your result. The ES's rule about wet paper towels is the test they will apply, so treat any sign of a crack as a reason to choose another egg.
The sudden deceleration of the Vehicle loads the egg through the tape and the dowels. A stop that jolts the Vehicle hard is more likely to crack the shell than a stop that brings the Vehicle to rest gradually. Designing for a smooth stop protects the egg and improves the distance score, which is a helpful combination.
The track and the target
The track is set up by the ES at in-person tournaments. At virtual tournaments, the team must supply a track that fully complies with the rules, and any deviation is a competition violation for every run.
- Surface. The track is smooth, level and hard. Your practice surface should match that closely, or your calibration will not transfer.
- Start Point. A tape strip about 5 cm by 2.5 cm, with the mark at its middle. At the start, the pointed tip of the egg has to sit above this mark, within about 1 cm. Other parts of the Scrambler may extend past the Start Point, but the mark must stay visible to the ES.
- Target Point. An approximately 5 cm × 2.5 cm tape with the Target Point at its center. It sits at the Target Distance from the Start Point, which is between 7.00 and 10.00 m.
- Terminal Barrier (TB). A solid vertical wall, at least 25.0 cm high and 1.00 m wide, set at right angles to the center line. Its middle sits on the Target Point. The egg's tip may not cross the front face of the TB, and nothing from the Vehicle except the egg may touch it.
- Bonus Line and cans. Halfway down the track, extending at least 1.0 m to the left; see the Can Bonus section below.
- Track area. The track area is 2.0 m wide and extends at least 1.0 m behind the Start Point. Sighting, aligning and guiding devices must be placed and used inside this area, and they cannot be electric or electronic.
- Cleaning and substances. Any substance you put on the Vehicle needs the ES's sign-off first, and it must not mark or damage the floor. You may clean the track during Event Time, but it has to end up dry.
Three rules here change how you practice at the tournament. Teams may verify the track dimensions with their own tools during Event Time. Without tournament permission, teams may not roll or test the Vehicle on the track floor on the event day or the day before (and if permission is given, only participants may be there), and during competition they may not roll it on the floor before or after runs. Rolling the Vehicle into the launcher to load it is allowed. Competitors may not put tape on the event floor.
The Can Bonus
The Can Bonus is the headline change for 2027. It is optional on every run, and skipping it costs nothing: a run without cans simply scores a Can Bonus of 0.
The setup
- Bonus Line. A strip of tape about 2.5 cm wide, laid halfway between the Start Point and the Target Point, at right angles to the imaginary center line (the straight line from Start to Target, which is not marked on the floor). It runs at least 1.0 m to the left of the center line when you face the target. The edge of the tape nearer the Start Point is the line itself.
- Cans. Two empty cans, 7.0 to 8.0 cm across and at least 10.5 cm tall (an empty vegetable can fits), standing upright with their centers on the Bonus Line.
- Outside can. The ES sets it so the edge facing the track is one meter left of the center line.
- Inside can. You set it anywhere from touching the outside can to a full meter away from it. That gap is the Inside Can Distance, which the ES measures before the run. You may place the inside can differently on each run.
So the opening you must drive through always sits on the left of the straight line, and its far edge is always 100 cm out. A wide gap (say 100 cm) reaches back to the center line and is easy to hit, but it is worth only 5 points. A narrow gap sits far to the left and is worth up to 55 points.
To earn the bonus, every part of the Vehicle must pass between the two cans, and the Inside Can Distance must be unchanged afterward. A wheel that nudges a can moves it, and the bonus is gone.
Planning the path
The Bonus Line is exactly halfway down the track, which makes a circular arc the natural path. A Vehicle that turns at a constant radius from the Start Point to the Target Point is farthest from the center line at the halfway point, and there it is traveling parallel to the center line, so its full width passes the cans square-on. A fixed steering offset (one wheel slightly larger, or a front axle set at a small angle) gives a constant turning radius without any moving steering parts.
Three consequences follow. First, your distance calibration must be done along the arc, not along a straight line, because the brake has to stop the Vehicle after 8.24 m of travel, not 8.00 m. Second, the Vehicle starts aimed about 24° left of the target, which you set with the launcher and an alignment device inside the track area. Third, the Vehicle meets the TB at the same angle, so a corner of the chassis can reach the wall before the egg does. Any part other than the egg touching the TB is a 150-point Competition Violation, so keep the chassis well behind the egg, or plan to stop just short of the wall.
Steering has to be built into the Vehicle. It must work on its own, contain no electronics and use no remote control or tether, and anything that is not part of the Scrambler must be moved behind the Start Point before the run, so you cannot lay guides on the track.
Design principles
The best Scramblers share a few traits. They are simple enough to test many times, they have few parts that can fail at check-in, and every performance-relevant variable is adjustable and measured. The principles below follow from the physics and the rules.
Make the drive repeatable
Every drive variable that changes the launch speed (drop height, falling mass, string attachment, axle friction) should be fixed and measured, or else adjusted in a known way. A string that slips on its axle, or a release that lets the falling mass drop unevenly, produces scatter that no brake setting can remove. Make the drive as close to identical from run to run as you can, and measure it.
This is also where the falling mass matters most. It has to fall freely, without catching on the frame, the string or the cushion. A mass that swings sideways as it drops changes the tension in the string and the energy transfer, so mount it so it falls straight.
The trigger deserves special attention. During the triggering action, participants may touch only the pencil, and actuating the release must not add energy to the Vehicle. A release that is pushed hard enough to kick the Vehicle forward violates the energy rule and changes the launch. A light, clean trigger that holds the Vehicle at rest until the pencil moves it is the goal.

Minimize energy loss
Reduce the losses that set η. Use stiff, well-supported wheels with good bearings. Keep the rotating inertia (k) low, which means lighter spokes or treads, not a heavy rim. Make the string attach to the axle without slip, and keep the string winding smooth. Each reduction in losses makes launch speed more predictable, and it raises the target distance you can reach from the same falling mass.

Keep the path predictable
Whether you run straight or on a Can Bonus arc, the path has to be the one you planned. A Vehicle that drifts sideways adds distance error in a direction you did not plan for. For a straight run, make the wheels match in diameter, set their alignment so they run parallel (toe and camber near zero), and keep the chassis stiff enough that it does not twist under the load of the drive. A low center of mass makes the Vehicle less likely to tip during hard braking, and a symmetric layout reduces any tendency to curve. Even a small difference in wheel diameter curves the path, because one wheel covers more ground per revolution than the other. For a can run, that same effect is your steering, so set it deliberately and measure the arc it gives.
Make the stop predictable and gentle
Choose a brake whose force you can set and repeat, and damp the stop so it does not recoil. A stop that is gentle on the egg is usually also the most repeatable stop, so the egg score and the distance score reward the same design.
Testing log
A testing log is the single most useful thing a Scrambler team can produce. It turns each run into data and gives you a calibration table for event day.
Record each run with: date and surface; falling mass; drop height; braking setting; wheel and axle changes; egg (fresh or used, and whether it broke); the measured stop position from the target; the run time; and any recoil or drift you saw. Change one variable at a time, and run each setting at least five times before you decide it works.
| Run | Setting | Distance from target (cm) | Run time (s) | Notes |
|---|---|---|---|---|
| 1 | Brake at position 2, drop 0.80 m | |||
| 2 | Brake at position 2, drop 0.80 m | |||
| 3 | Brake at position 3, drop 0.80 m |
Two habits make a log trustworthy. Use the same timing method every run (the rules use three timekeepers and count the middle time, so practice that), and record run time to the precision of your timer. Keep the scatter and the offset as separate columns, because they need different fixes.
Strategy
Split the work by job, not by part. One partner leads the build and the tuning on the device, and the other keeps the testing log, runs the score math, and rehearses the design-knowledge answers from the Building Policy. Swap jobs before event day so each of you can explain the whole device.
Plan the sequence around the clock. Your 8 minutes of Event Time begin when the ES says so, and they include attaching the falling mass and the egg. Practice the full attachment sequence until it takes a predictable time. Bring spare parts for the most likely failures, such as a fastener, a string and a spare brake pad. Spare parts must go into your impound with the Scrambler, so pack them before you hand the device in.
Plan for the first run. The first run is where the egg is most at risk, and a broken egg ends your Event Time. Use run 1 for the setting you trust most, not the setting you are hoping will be better. Because the final score is the better of two runs, run 2 can take a calculated risk: try the can path or a narrower gap only if run 1 went well, or make a small brake adjustment based on what run 1 showed you.
Keep the pre-run checklist short and fixed. Check the size box, the cushion under the falling mass, the egg tip over the Start Point, the pencil trigger, the wheel contacts on the floor, the tape on the egg, the dowels and backstop, and that nothing loose is attached to the Vehicle. Do the same checklist before every run, so a missed item is always the same missed item.
Ask before you run. The ES announces violations only at the end of each run, but you may ask about a specific suspected violation before the run. If you are unsure whether a part meets the rules, ask at check-in when the clock is paused, not in the middle of your run.
Common pitfalls
How tournaments test this
Scrambler is a build event, so the test is the run, not a written exam, and there are no archived Scrambler questions on the site. The ES checks the Vehicle in its ready-to-run configuration against the construction rules (and the Kit Modification Form, if you used a kit), may ask design-knowledge questions under the Building Policy, judges each run as successful or failed, and measures Vehicle Distance to 0.1 cm and Run Time with three timers, taking the middle time. Because the better run counts, one dependable run beats two average ones. The tournament is testing whether your device does what you said it would, on the ES's surface and at the ES's target distance, and whether you can explain why.
Test yourself
There are no archived Scrambler questions to draw on, so the practice problems below are written for this guide. Work each one before you open the answer. Every answer uses the rules and formulas above.
References and further reading
- Science Olympiad, 2027 rules manual, Scrambler B, and the Building Policy, Eye Protection policy and Kit Modification Form on soinc.org. These are the authoritative sources for every rule in this guide.
- SciOly Wiki, Scrambler (another summary of the event): https://scioly.org/wiki/index.php/Scrambler
- OpenStax, University Physics Volume 1, chapters on work and energy, and on rotational motion and rolling without slipping: https://openstax.org/details/books/university-physics-volume-1
- Wikimedia Commons, figures used in this guide, with their licenses and credits as listed in the figure blocks above.
- Related guides on this site: Boomilever, Experimental Design and Electric Vehicle, for shared build-and-test practice.
Official references
Sample notesheet
Download a printable, rule-compliant sample notesheet. Customize with your notes.